

Hi! My name is Lisa and I blog over at Love to Color My World. When I was asked to be part of the Christmas in July hop, I knew I wanted to make a stocking. Eight years ago, my sister-in-law asked me to make stockings for her three kids. I’ve now become the unofficial stocking maker of the family and have made sixteen stockings (there’s another nephew arriving in August, so that number will be 17 soon!). Each family’s is a little different–you can see my gallery here.
Most of the stockings I’ve made have been more traditional Christmas colors. I saw the Glisten collection by Whistler Studios and fell in love with the idea of a sophisticated silver and gold stocking. These prints are subtly holiday, and two in particular lend themselves to fussy cutting–perfect for adding stocking detail without a lot of work. In addition to the tutorial I’m sharing here, I’ve featuring a different stocking tutorial on my blog, so please stop by to see it!

Materials:
9 fat quarters*
1/2 yard of lining fabric
12″ x 22″ piece of batting
12″ x 22″ piece of fusible interfacing
Fabric chalk
*You’ll only use a strip or two from many of these fat quarters, so you’ll have plenty left to make additional stockings or some other Christmas project!
Let’s get started!
Download the template here. You’ll have to assemble the three pieces to make the full stocking shape. Then you can decide which way you’d like your stocking to face–I’ve seen them both ways! Lay the stocking template on the batting piece and trace it. This will help ensure that your fabric strips cover the entire stocking shape.

We’ll be assembling this stocking front quilt-as-you-go style. I’ll list the strip widths I used to piece the stocking front, but you can also use whatever strip widths you’d like. The lengths are approximations–just make sure your strip is long enough to cover the stocking outline. Reserve one full fat quarter for the stocking backing.
Cut one 3-1/2″ x 12″ gray strip and one 1-1/2″ x 12″ gold strip. Layer the gray strip right side up, making sure it covers the bottom of the stocking outline by at least 1/4″. Layer the gold strip on top, right side down. Pin, and then stitch through all three layers.

Press the strips open.

Tip: Each time you add a strip, check to make sure the top edge is straight. If it’s wavy or crooked, fold the batting back and trim the crooked edge.

Fussy cut a 2-1/2″ x 12″ snowflake strip. (Here’s what this fabric looks like–I love the houses too!)


Add the snowflake strip to the stocking.

Add a 3-1/2″ x 12″ white/gold snowflake strip.

To make a pieced squares strip, cut a 1-1/2″ x 22″ metallic gold and metallic silver strip. Cut each in half so you have four 1-1/2″ x 11″ strips. Sew together to make a strip set and then cut two 1-1/2″-wide segments. You’ll have leftover strip set length to make another stocking!
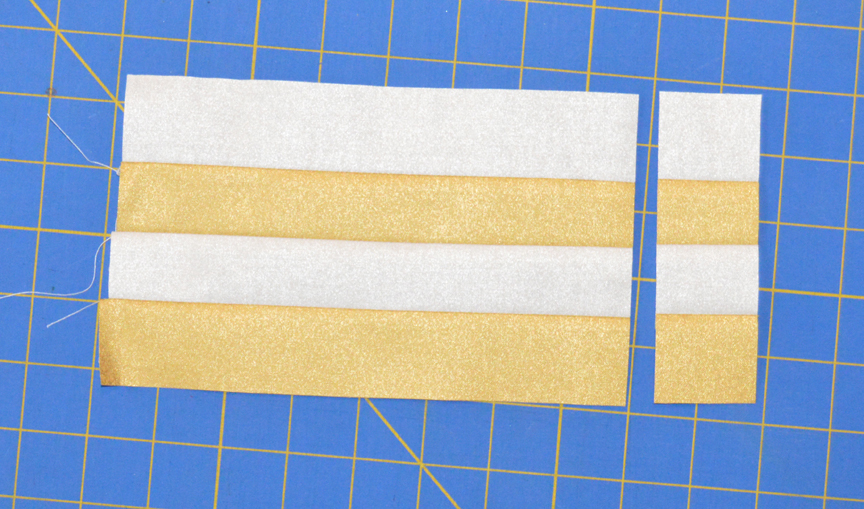
Sew the two segments together to make the pieced strip.

Add the pieced strip set.

Fussy cut a 4″ x 10″ reindeer and sleigh strip and add to the stocking, centering the sleigh and reindeer on the stocking shape. Here’s what the reindeer print looks like:


Finish the pieced front off with a 1-1/2″ x 10″ gold strip, a 2-1/2″ x 10″ silver/white snowflake strip, and a 3-1/2″ x 10″ gold strip. Tip: Cut your last (top) strip wider than you need it. This gives you some wiggle room to make your stocking slightly taller or to simply square up the stocking top.
See how my pieced stocking front shifts to the side? That’s fine because it’s following the stocking shape. You can also use longer pieces of fabric; you’ll just have more to cut off in the next step.

Lay the stocking template on top, making sure the strips are straight and fabric covers all the areas under the template. (The stocking shape doesn’t have to line up exactly with your original drawn line–that was just a guide.) Pin the template and cut out around the shape.

Your stocking front will look like this:

Following manufacturer’s directions, fuse the interfacing to the wrong side of the fat quarter you’ve reserved for the stocking back. Lay your stocking front on top, right sides together, pin in place, and cut around the stocking shape. You could use the template as well, but I like to use the stocking front to eliminate any possibility of cutting out the backing shape with the stocking toe facing the wrong direction! 🙂

With the front and backing still right sides together, sew around the stocking with a 1/4″ seam allowance, leaving the top edge open. Turn right side out.

Fold the lining fabric in half right sides together. Pin the stocking template on top (direction doesn’t matter here!) and cut out the shape. Sew around stocking edge. Leave wrong side facing out.

I cut the stocking binding and loop from the same fabric–the metallic silver. Cut a 2″ x 9″ piece for the loop and a 2-1/4″ x 22″ piece for the binding. Press the binding strip in half lengthwise wrong sides together as you would for a quilt. Press the 2″ x 9″ loop piece in half lengthwise wrong sides together, then open up and fold each long raw edge in to the center fold and press again. Refold on main seam to enclose all raw edges and stitch down the middle. This is your hanging loop.

Tuck the lining inside the stocking so wrong sides are facing. Line up the top edges of stocking and lining, and pin, aligning the seams of both layers. Fold the loop in half and pin raw edges to the lining, just to the back side of the non-toe side seam.

Stitch back and forth with a scant 1/4″ seam allowance to secure the loop (this will all be covered up in the next couple steps). Pin the binding in place, matching raw edges, like you would a quilt. Arrange binding strip so the seam will be on the back of the stocking, near a seam, where it will be least visible.

Stitch the binding to the stocking layers from the inside of the stocking. This may seem strange, but trust me, it’s much easier! Join the raw ends of the binding with a straight seam rather than the traditional angled seam–it’s just easier on a project this small.

Fold the top of the stocking down for easier access and hand stitch the folded edge of the binding to the stocking lining.

After the binding is secure, fold the loop up and stitch back and forth several times where the loop is folded. This will make it more secure and point it in the right direction.
Giveaway Alert! You can win a Fat Quarter Bundle of Glisten! 

Be sure to “like” our Facebook page , Follow my blog with Bloglovin and comment on Lisa’s post and tell us what you would do with the bundle! We’ll choose the winners at the end of the blog hop!
Good luck and Happy Sewing!

HELLO, like on FB,follow on Blg lovin’!
Love your stocking! I’d make a beautiful Christmas Table Runner!
Thanks for sharing a sweet bundle giveaway!
I love your stockings. I think I would make an Ornament Wallhanging or a Wrapped Present Wallhanging. Beautiful fabric.
Absolutely love this stocking.
Beautiful stocking! Thank you for a great tutorial. I would make a Christmas wallhanging for our new home.
What lovely fabrics! Would be great for making some Christmas gifts…
Oh My Gosh, love the rich looking fabrics. I would make some kind of wall hanging with a Christmas tree using the gold colors and silver trim. Thanks.
omgoodness love the stocking….I think a stocking is a great idea….ty for the show and tell………………..happyness04431@yahoo.com
i think a tree skirt would be nice. I follow you via Feedly, and I commented over on Lisa’s blog. Sorry i don’t have facebook to like you.
Absolutely love the fabric. Even in 100+ degrees, it makes me long for Christmas with cold weather and snow. Even though I live where it is never cold and there is snow oly on TV.
What scrumptious fabric! I think it calls for a wall hanging. Thanks!
I love your stocking and I would love to try one myself. Failing that, my SIL is after a new Advent calendar so I may have to make one from this gorgeous fabric. Love the colours!